When I first started knitting, I remember how overwhelming understanding knitting terminology was – all the different terms and abbreviations that came with it. I’d open up a pattern, excited to start my project, only to be completely confused by the instructions.
What exactly does “YO” mean? And why are there so many abbreviations that feel like another language? I’ve experienced and know how difficult it can be to get past that initial stage where you’re just trying to make sense of the knitting words.
Learning the basics of knitting isn’t just about understanding the mechanics of stitches—it’s also about familiarizing yourself with the words that patterns use. The good news is that once you grasp the common terms, patterns will feel less intimidating. In this guide, I’ll walk you through the essential knitting terms that every beginner needs to know, because I believe that the more comfortable you are with the terminology, the more enjoyable your knitting journey will be.
AFFILIATE DISCLAIMER
Disclosure: This post may contain affiliate links for products recommended. This means that if you click a link and buy something I may receive some compensation, but this is at no cost to you the reader. Thank you for visiting this website.
Mastering Terminology to Improve Confidence & Skill
By the end of this post, you’ll feel more confident in your ability to read patterns, follow along with tutorials, and be able to begin new projects without hesitation. Let’s break down those terms that might have been tripping you up so you can focus on the enjoyable part: knitting.
Basic Knitting Terms
When you’re just getting started with knitting, many of the words you’ll come across might seem confusing. But really, these terms are just shorthand for some of the basic movements and stitches that form the foundation of almost every project. Once you understand what these key terms mean, you’ll be able to follow patterns more easily and start knitting with a lot more confidence. I found it helpful to have a little notebook where I could write down any new terms I did not recognise.
Knit K and Purl P
First, let’s talk about two of the most fundamental stitches: knit and purl. These are the building blocks of almost everything you’ll make.
When a pattern tells you to knit (often written as “K”), it’s telling you to create a stitch by pulling the yarn through a loop in a certain way. Watch this video here for how to do it. If you knit all the rows as knit stitches the stitch pattern you get is called GARTER STITCH G st This is the most basic knitting pattern and only involves the knit stitch.
Purl (or “P”) is essentially the opposite—though the two stitches are closely related, they create different textures when combined. Find out how the purl stitch is done HERE
Casting On & Binding Off (Cast Off)
Then there’s CASTING ON, which is how you start your project by placing stitches on your needle. To find out how to cast on read this post which has a tutorial video
You’ll also come across BINDING OFF, which is what you do at the end of your project to finish it, securing the stitches so they don’t unravel. This post shows you how to bind off – also known as cast off.
These are the basics, but knowing these terms—knit, purl, cast on, and bind off—will help you tackle a wide range of patterns. They’ll keep coming up again and again, so the more comfortable you are with them, the easier everything else will be to learn.
Once you’re comfortable with the basic knit and purl stitches, you’ll start seeing patterns that combine these in different ways to create textures and designs. That’s where understanding various stitch types and their abbreviations becomes really important. While it might feel like a lot at first, these combinations are what give your projects personality and structure.
Stitch Types and Abbreviations
Stockinette or Stocking Stitch St st

One of the most common stitch patterns is the stockinette stitch, which is often abbreviated as “St st” in patterns. It’s created by alternating rows of knit stitches on one side and purl stitches on the other.
This stitch creates a smooth, classic fabric that you’ve probably seen in everything from sweaters to scarves.
Garter Stitch G st

Another basic pattern is garter stitch, sometimes abbreviated as “G st,” which is even simpler—all knit stitches on every row. It’s a bit thicker and more textured than stockinette, making it great for cozy blankets or warm scarves. To find out more about this stitch read this post here
Ribbing
Another term you’ll come across frequently is ribbing, which is a combination of knit and purl stitches within the same row.

Ribbing is what gives cuffs and hems that stretchy, structured look, and it’s usually written as something like “K2, P2,” meaning you’ll knit two stitches, then purl two stitches, repeating that sequence across the row. Ribbing not only adds texture but also helps your fabric keep its shape.
Yarn Over YO
You’ll also encounter abbreviations like YO, which stands for yarn over. This is a technique used to create decorative holes in your knitting or to increase the number of stitches in a row. While it might sound tricky, it’s simply wrapping the yarn over your needle before working the next stitch.
These stitch types and their abbreviations can feel like a bit of a code at first, but as you practice, they’ll start to make sense. They give you the flexibility to create different textures and designs, and before long, you’ll be reading them almost automatically.
Common Instructions Found in Patterns
As you start working through more knitting patterns, you’ll notice that beyond just basic stitches, there are certain instructions that come up frequently. These directions help shape your project, adjust the number of stitches, and sometimes create more intricate designs. Getting familiar with these common instructions will help you follow along more smoothly and understand how your knitting is meant to take shape.
Increase Inc
One of the key instructions you’ll see is increase, often abbreviated as “Inc.” This tells you to add more stitches to your row. There are different ways to do this, but the goal is always the same: to make your project wider or create additional space. Increasing can be used for everything from shaping sleeves to creating decorative patterns.
Click Here to find out three ways to increase in knitting
Decrease Dec
On the flip side, there’s decrease, abbreviated as “Dec.” This is the opposite of increasing—you’re removing stitches to make your project narrower or to create shaping. Decreasing is often used to taper a piece of knitting, like when you’re working on the crown of a hat or the waistline of a sweater.
Discover 3 ways to decrease in knitting click here
Slip Stitch Sl st
Another instruction that might seem a little odd at first is slip stitch, abbreviated as “Sl st.” This simply means moving a stitch from one needle to the other without actually knitting or purling it. Slip stitches can be used for a variety of reasons, such as creating a smooth edge, working on colour patterns, or even just temporarily holding a stitch in place.
Repeat Rep
You’ll also frequently come across the term repeat, often written as “Rep.” This instruction tells you to repeat a certain sequence of stitches a set number of times. For example, a pattern might say, “Rep the last 4 rows,” meaning you’ll work those same four rows again before moving on. Understanding repeats is key because many patterns use them to create consistent designs without having to write out every single stitch.
These instructions—increase, decrease, slip stitch, and repeat—are fundamental to many patterns, and once you’re comfortable with them, you’ll find it much easier to interpret the steps that patterns layout. They give you the flexibility to shape your projects and create more interesting designs, adding both structure and creativity to your knitting.
Yarn Types & Needles
When you’re starting out in knitting, it’s easy to focus on learning stitches and following patterns, but understanding the different types of yarn and needle sizes is just as important.
The combination of yarn weight and needle size directly affects how your projects will turn out—both in terms of how they look and how they feel. Choosing the right materials can make all the difference, especially when it comes to achieving the right texture and fit for your piece.
Yarns
Yarn comes in various weights, which essentially means how thick or thin the yarn is. You’ll hear terms like fingering, sport, DK, worsted, and bulky. Fingering is a very light yarn, often used for projects like socks or delicate shawls, while bulky yarns are thick and great for quick projects like chunky scarves or blankets. The weight of the yarn you choose will affect how big your stitches are and how your fabric drapes. Patterns usually specify a yarn weight, but it’s useful to know how to identify the right one for your project, especially if you’re choosing your own yarn.
Gauge
Then there’s gauge, which refers to the number of stitches and rows per inch that you knit.
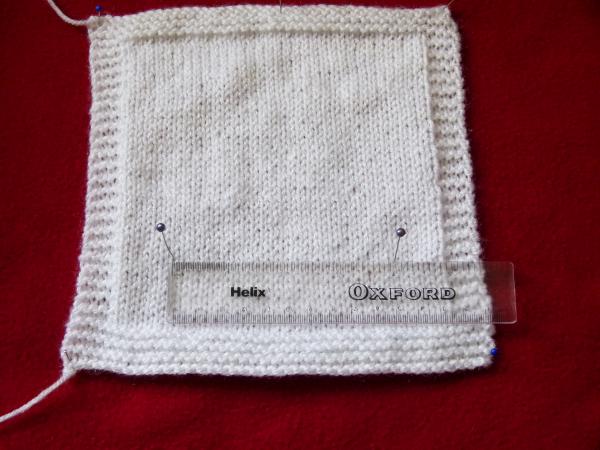
Gauge is important because it ensures your finished project matches the dimensions given in the pattern. If your gauge is off—meaning your stitches are too tight or too loose—your project might end up too small or too large. Most patterns will include a gauge swatch that you can knit to check whether your stitches match up to the recommended gauge. This is where your needle size comes into play.
Needles
Needles come in different sizes, usually labelled in millimetres. Thicker yarns generally require larger needles, while finer yarns need smaller ones. For example, a worsted weight yarn often pairs with needles around 4.5 to 5.5 mm, while fingering weight yarn might use needles around 2.25 to 3.25 mm. Needle size affects not only the size of your stitches but also the feel of the fabric—larger needles create a looser, more open weave, while smaller needles produce a tighter, more structured fabric.
It’s important to match your yarn and needle size carefully to your project because they work together to create the overall look and feel of your finished piece. With a little experience, you’ll start to develop a sense of which combinations work best for different types of projects, making your knitting more enjoyable and your results more satisfying.
Reading Charts and Symbols
Once you’re familiar with knitting terms and basic stitches, you might come across knitting patterns that use charts instead of—or alongside—written instructions. At first glance, knitting charts can seem complicated, but they’re actually a visual way to represent a pattern, often making it easier to follow intricate designs once you understand how to read them.
A knitting chart is essentially a grid where each square represents a stitch. The symbols inside those squares tell you what type of stitch to make. For example, a blank square might represent a knit stitch, while a square with a small dot or dash might indicate a purl stitch. More complex symbols can stand for things like increases, decreases, or yarn overs. Each chart will have a key explaining what the symbols mean, so it’s always a good idea to refer back to that as you work.
One thing to remember is that charts are typically read differently depending on whether you’re working on the right side or the wrong side of your knitting. For patterns that are knit flat (back and forth), you’ll read right-side rows from right to left, and wrong-side rows from left to right. If you’re working in the round, you’ll always read the chart from right to left. This can take some getting used to, but once you understand the flow, it becomes quite intuitive.
Charts are particularly useful for projects with colourwork, lace, or cables, where it’s easier to see the pattern visually rather than reading a long list of instructions. For instance, if you’re working on a lace shawl, the chart allows you to visualize where the yarn overs and decreases should go, helping you see the design as it forms. Similarly, for colourwork, each square on the chart corresponds to a stitch in a specific colour, making it easier to keep track of where to change yarns.
Though they can feel intimidating at first, knitting charts are designed to simplify complex patterns, allowing you to focus more on the rhythm of your knitting. By learning to read charts and their symbols, you’ll unlock the ability to tackle more intricate projects with confidence, making them a valuable tool for knitters of all levels.
Knitting Tools Terminology
As you get deeper into knitting, you’ll notice that beyond yarn and needles, there are a few essential tools that can make your projects easier to manage and more enjoyable. These tools each have their own terminology, and knowing what they’re for will help you follow patterns more smoothly and stay organized throughout your project. Let’s take a look at some of the most common knitting tools and what they do.
Stitch Marker SM
One tool you’ll come across often is the stitch marker, abbreviated as “SM” in patterns. Stitch markers are small rings or clips that you place on your needle to mark specific points in your work. For example, you might use them to indicate the start of a round when knitting in the round, or to separate different sections of your knitting, like pattern repeats or increases. They’re incredibly helpful for keeping track of where you are, especially in more complex projects.

Tapestry Needle
Another useful tool is the tapestry needle, sometimes called a darning needle. It’s a large, blunt needle that you’ll use to weave in the loose ends of yarn when you finish your project. You’ll also use it for seaming, which means joining two pieces of knitting together, like when you’re assembling the front and back of a sweater. While it might seem like a small detail, weaving in ends and seaming neatly can really elevate the look of your finished project.
Cable Needle CN
If you’re working on cables, you’ll need a cable needle (often abbreviated as “CN”). This is a short, double-pointed needle that holds stitches temporarily while you work others around them to create a cable. It might feel tricky at first, but cable needles are key to making those beautiful twisting patterns you often see in sweaters and scarves.
There are also a few tools that aren’t mentioned in patterns but are great to have on hand. Row counters, for instance, help you keep track of how many rows you’ve knit, especially in patterns with a lot of repeats. Blocking mats and pins come into play when you’re finishing your project—they allow you to shape your knitting by gently stretching it out and letting it dry, which can improve the appearance of lace patterns and textured stitches.
Knowing the terminology around these tools can make a big difference in how smoothly your knitting projects go. They might seem like small details, but these tools are essential to making your knitting look polished and professional. Plus, as you start incorporating them into your process, you’ll find they make knitting even more enjoyable and satisfying.
Final Tips
When you’re learning to knit, the terminology can feel like a new language, but with time and practice, it becomes second nature. One of the best ways to get comfortable with knitting terms is to use them regularly.
As you work through patterns, take the time to look up any abbreviations or techniques that are unfamiliar. I found it helpful to keep a list of terms in a small notebook nearby when I was starting out—it gave me something to refer to without feeling stuck.
Another good tip is to practice with small projects that incorporate different stitches and techniques. I love knitting dishcloths, scarves, and simple hats as they are small, useful projects to try out new skills in manageable amounts. You’ll also get more familiar with how patterns are written and how the instructions translate into physical stitches. The more you experiment, the more natural the terminology will feel.
Don’t forget that the knitting community is full of resources. I find online videos on YouTube and forums especially helpful in explaining a tricky term or technique. Patterns often seem more intimidating than they actually are because of unfamiliar words, but once you break it down, everything becomes a lot clearer. The key is to be patient with yourself and to approach learning to knit as a gradual process.
Conclusion
Learning the words used in knitting is an important step in becoming a more confident and capable knitter. When you understand the terms and symbols used in patterns, you unlock the ability to tackle more complex projects and experiment with new techniques. I know how overwhelming it can feel at first—there’s a lot to absorb—but with time, it gets easier. Just remember that every experienced knitter was once in your shoes, learning the same basics and figuring things out one stitch at a time.
By familiarizing yourself with the common terms we’ve covered in this guide, you’ll begin to view patterns in a new light. Instead of feeling that they are a jumble of abbreviations and symbols, they’ll become clear instructions that guide you through each project. And with every new project, your knowledge and skill will only grow, making knitting a more enjoyable and rewarding hobby.
For more help visit the Learn to Knit category HERE


