In this post, you will learn how to do the purl knitting stitch quickly and easily. This is what I would call the second most basic stitch after the knit stitch.
When you have mastered the knit and purl stitches you will be able to use them to create many projects. After all the whole reason to learn to knit is so that you can make things like scarves, blankets, hats, toys and many other accessories.
The knit and purl stitches are what you might think of as opposites of each other. When you know how to do both of these stitches you will find that there are a wide variety of knitting patterns that you can achieve.
For example, take a look at this Knit Stitch Pattern Book of 50 designs that can be achieved only with knit and purl stitches alone.
In knitting patterns, the abbreviation P is used when you need to do the purl stitch. If you do knit stitches on every row then the pattern you get is called GARTER STITCH.
If we knit one row, then purl the next, and repeat that sequence then the resultant pattern is called STOCKINETTE.
Watch the video below, along with the instructions underneath it, to discover just how to master this stitch.
Knitting Supplies Needed
Super Chunky Yarn
Bamboo Knitting Needles set of 9 mm (US13)
Step by Step Instructions from the video
- Cast on however many stitches you want to use to practice with and do one row of knit stitches.
- Turn the knitting over and keep it on the left-hand side as shown in the video.
- With the right-hand needle, and beginning to the right-hand side of the first stitch, put the point of the needle into the first stitch.
- Keep the right-hand needle on top of the left-hand one – making a cross
- Bring your yarn to the front ( with purl knitting always have yarn at the front of the work)
- Wind the yarn around the top (right-hand needle) in a counterclockwise manner
- Now push the right-hand needle down and pull through a loop onto the right-hand needle
- Pull that loop to a tighter tension
- Push the other stitches on the left-hand needle up towards the end of the needle to make it easier to push the first stitch off as shown in the video.
- Repeat these steps for the rest of the stitches you have.
Use Your New Skill in a Project
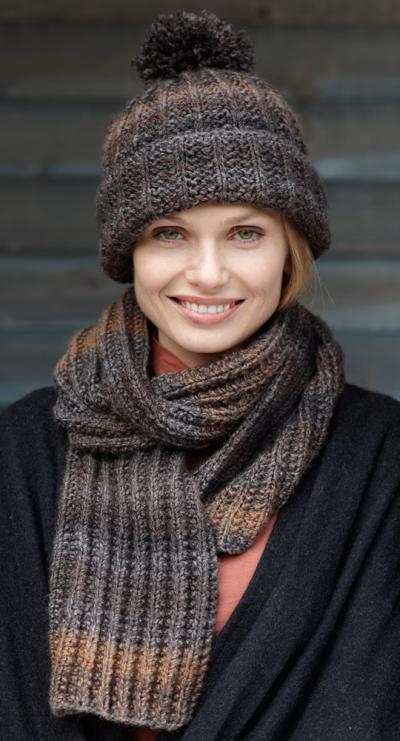
There is no better sense of achievement than to make something using a new skill. Now that you know how to do the knit and purl stitches, there are many projects you can take on.
For example, this free scarf and hat pattern uses only the knit and purl stitches so it’s ideal for new knitters! Download it here