At the time of writing, I am knitting a toy frog for my eldest grandnephew and the pattern talks about short rows. I have heard about the method but was not exactly sure how to knit short rows on straight needles with the wrap-and-turn technique that’s detailed in the instructions. As I’m a stickler for accuracy I searched around online to find out all the ins, outs and whys to do with method.
Sometimes, when we come across something unfamiliar we dismiss it as being too difficult and try to find an easier project. Short rows are not difficult to perform once you understand what they are all about.
So I can refresh my memory in the future and for anyone else who might be needing this information, I have placed all I discovered in this post. Here’s hoping it will be of use to others.
What are short rows in knitting?
What are they?
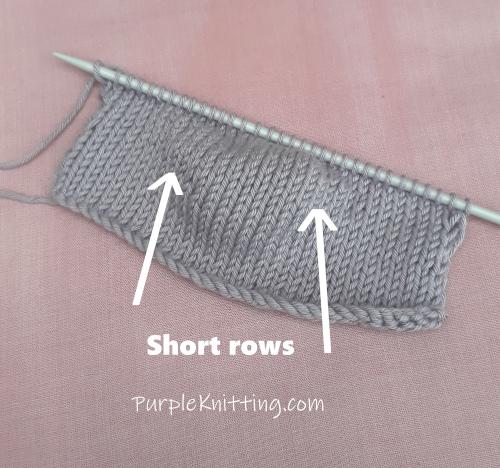
Short rows are when you knit to a certain point in a row ( called the turning point) then turn your work and knit a specified number of stitches in the other direction, turn again and knit back. These short rows as you can imagine add extra knitted fabric at the point where they are done.
Purpose?
Next, the thing I needed to know was what is the purpose of short rows?
This method is used to add an extra bit of fabric at a precise point in the knitting that ends up creating a shape. In the case of my toy frog, I had to make an extra wedge to create the back ridge on the frog. This technique is also used in knitting socks, shaping the collar and neck areas on shawls, sweaters and cardigans and shaping pieces for making knitted soft toys.
Methods of Working Short Rows
As with a lot of techniques in knitting, there are several ways of working a short row. I discovered that there are seven different ways of doing them!
To avoid confusing myself I have stuck to the wrap-and-turn method as this is the technique described in my frog toy pattern.
Wrap & Turn Short Row Technique
One of the problems with short rows, if not done correctly, is the issue of holes appearing when you turn to knit in the other direction.
Watch the video below where Purl Soho demonstrates the technique on both the knit and purl rows when doing stockinette stitch.
In the video, you will see that when reaching the turning point (before working in the other direction) she wraps the next stitch and then returns it back to the left-hand needle.
We also learn another trick which further closes up holes and gaping that develops when doing this wrapping and turning short-row method.
“When you reach the wrapped stitch, knit into the wrap loop and the stitch sitting on the needle as if you were knitting/purling 2 together – to close up and prevent holes“
Purl Soho
Summary of Wrap and Turn Knit/Purl when Doing Short Row Knitting
Wrap and Turn Knit (W +Tk)
- Wrap the stitch after the one that is your turning point
- To do a wrap and turn on a knit row
- start by slipping the next stitch purl-wise onto the RH needle,
- bring working yarn to the front of the work between needles
- slip the slipped stitch back to the left-hand needle from the right one
- then move the working yarn from front to back of the work
- switch needles in your hands and so turn the knitting
Wrap and Turn Purl (W + Tp)
- Wrap the stitch after the one that is your turning point
- To do a wrap and turn on a purl row
- start by slipping the next stitch purlwise from the left needle to the right one
- Take working yarn from the front of the work, between the needles to the back of the work
- Take slipped stitch from the right needle back to the left one
- now bring yarn from the back of the work, between the needles to the front of work
- switch the needles and turn the work
To reduce holes and tighten up the knitting remember the trick to knit into the wrap of the wrapped stitch as well as the stitch loop on the needle as if you were doing a knit /purl together.
So there you have the ins and outs and whys of short-row knitting on straight needles using the wrap-and-turn technique. There are several other ways of doing short rows but it’s best to master one method first and as my pattern called for this one, it’s the one I am going with first.


