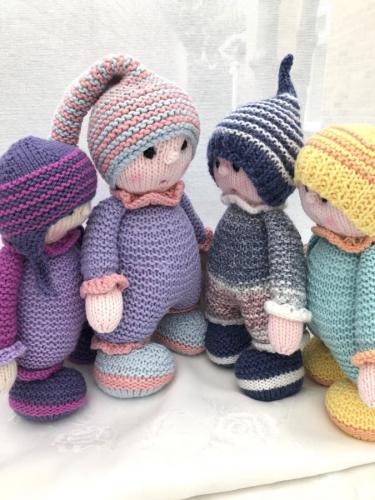
This pattern for a knitted first doll toy for a baby with 4 hat styles, is just what I was looking for to make for my grandniece, due in a few months.
I was looking for something small like this one, that does not overwhelm a baby and which could be carried around easily. When finished this project will be around 25 cm (10 inches) if you follow the recommended yarn weight of Aran / worsted.
Get the Pattern
To purchase a copy of the pattern for a small investment – Click the image of the dolls (affiliate link) to visit the website.
Knitting Project for Beginners
On this website, I like to make suggestions about knitting projects for beginners and this one is ideal for new knitters to do. The skills you will need are as follows –
- Cast on and cast off
- Knit and purl stitch
- increase by way of knitting into the front and back of a stitch
- Stocking stitch – knit right side rows and purl wrong side rows
- Reverse stocking stitch – this is when you purl the right side rows and knit the wrong side rows
- decrease by way of knitting 2 stitches together
Watch the video below to see how reverse stocking ( or stockinette) stitch is done and why it is used.
What Yarn to Use?
The suggested yarn is Aran / Worsted weight of which you will need around 125g in total. For each of the colours, you will need around 25g except for the body and arms section which needs around 50g. If you have double knitting or another weight of yarn it will work too but the size will change of course. This means that this pattern is a good choice if you have a stash that you want to use.
Cotton yarn like the Paintbox Aran range is a good choice as this natural fibre is best used when you’re knitting for a baby. 100% cotton is also very easily washed without any damage to the item.
What Size Needles to Use?
If you are using Aran / Worsted weight of yarn then the recommended size needles are a pair of 3mm (US 2.5) single-pointed straight knitting needles. If you choose to use double-knit yarn then you will use 2mm (US 0) needles.
What Else Do You Need for this Knitting Project?
Besides the 4 main colours, you will need some bits of black yarn to embroider the eyes and red for the mouth. Toy filling is also needed to stuff the doll once you have sewn it together with a large eye tapestry needle.
Guide to Sewing Up Your Toy
One of the things I like about this pattern is that you get detailed instructions on how to sew up your toy once you have knitted the flat sections. Quite often, with some patterns, the designers leave you with minimal instructions on how to put the knitting together – and this can be quite frustrating as you’re excited to see how it turns out but are puzzled. With this pattern, you get 5 pages of very detailed step-by-step instructions with photos on how to –
- sew the body/legs/feet and head section together
- fold and sew the arms
- to fill the toy with stuffing and some tips to bear in mind when doing this step
- embroider the eyes
- sew the hat to the head of the doll
- fill and attach the arms
This is an ideal starter project for a new knitter who has learned and practised the basic foundational knitting skills and wants to make an item that is useful and practical for a new baby. The instructions are clear and detailed and it uses very little yarn. Stash yarn can be used for this project too.
Like the toy dogs that I knitted for my 4 grandnephews, I think these are going to be popular for any grandnieces in the family. As I have a huge stash of yarn. I plan on using it to make them.


