Disclosure: This post may contain affiliate links for products recommended. This means that if you click a link and buy something I may receive some compensation, but this is at no cost to you, the reader. Thank you for visiting this website.
It’s coming up to a year since my niece had her first child, and I wanted to send him something for his birthday. As they live so far away in Australia it had to be something light that I could post. I decided on a hand-knitted doy toy. Actually, I have made him two items one for his birthday and one for Christmas as it’s not too far off.
The last time I made a toy was when I was in junior school many years ago. Way back then I made a monkey. It was quite painstaking as my mother had to teach me each step of the way. I am not an advanced knitter at all – barely intermediate so if I can knit this Jack Russell dog others can too!
In this post, I’d like to show you exactly how I made him in the hope that you can have the confidence to give it a go. I shared a picture of him amongst my family and friends and received lots of compliments and requests for orders. Christmas is coming and what child wouldn’t love to have one as a gift. I think handmade items are so much more appreciated than something that’s been bought from a shop.
Time and Project Difficulty
I was able to complete this project in 5 days. This was because I was only able to work on it mostly at night and a little more over the two days of the weekend. I did not find it difficult to do at all. I feel that even if you are fairly new to knitting you will be able to make it.
Knitting Skills Required for this project
These are the stitches you need to know how to do:
- Casting stitches on and off
- Decreasing by knitting 2 stitches together – k2tog and
- Decreasing by the ssk method which is slip one stitch knitwise, slip the next one purlwise, then with the left needle knit through the front of these two stitches.
- Increase by knitting into the front and the back of the same stitch
- Increase a stitch with a yarn over – abbreviated yo
Find out, or refresh your memory on how to do these decrease stitches HERE
For the techniques on increasing stitches, view this post.
Use this Project to Learn New Skills
If you are not familiar with these knitting skills it would be a good time to learn them while creating such a lovely thing as this toy. This pattern is an ideal one to learn to put these skills into practice as they are done over small sections so you’ll not become overwhelmed.
So Where Do You Get the Pattern?
Get the Jack Russell dog knitting pattern at no cost from the following link www.gathered.how/knitting-and-crochet/knitting/free-jack-russell-toy-pattern
I downloaded it to my phone as I find it easy to follow from there. You can also download and print it if you prefer to work that way. When you go to the link to download it you’ll see that the pattern is detailed in the post – scroll to near the bottom of it where you’ll see the link to download. It is advisable to download rather than work from the post as it has more information such as how to sew it up, the abbreviations and notes on the techniques involved.
Tips for Sewing Up Your Toy
The video below shows several tips on ways to sew your item together to get the best finish possible. These are techniques like gathering up your stitches to finish a piece and how to create invisible seams sometimes also called mattress stitch.
Recommended Yarn
In the pattern, you will see that the yarn required is Studio DK Acrylic 100% acrylic anti-pilling. The colours suggested are white, oatmeal, ebony and raspberry but you can of course use the colours you prefer.
The brown oatmeal yarn colour is for the head, parts of the hind legs and a bit in the tail. The raspberry colour is for the collar, but if you have little bits of left over yarn you can use those as it does not need much.
Needles?
The instructions called for the use of 3.75mm needles but I used 4mm as my knitting tends to be a bit tight. I recommend a pair of shorter needles like 25cm lengths as you will only be casting on few stitches for each of the pieces. As this project does not involve fitted garments it’s not necessary to worry too much about gauge and getting things exactly as the pattern says – as long as you use the same needles through out – it will turn out just fine!
You will need some toy filling with which to stuff your toy , a pair of 12mm toy safety eyes and a 10mm button for the collar. I decided not to buy the plastic eyes and the button on the collar due to safety reasons. Instead, I did a bit of satin stitch embroidery and backstitch to create the eyes. For the collar, I just stitched it together without a button.
Making Up
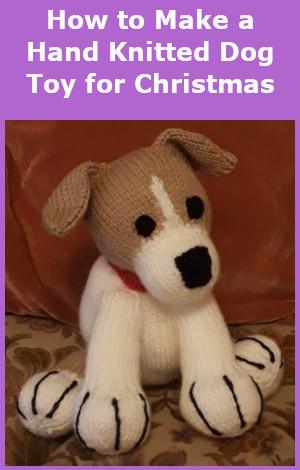
As you follow the pattern you will see that you begin with the head which starts off in a beige colour. It is knitted starting from the back of the head with a few stitches and then increases to form the ball of the head. A strip of white knitting is done to form the line down the front of its head. After casting off in white you then knit the snout also in white. These two sections, the head and snout are joined together using mattress stitch to form the shape of the head.
After that the nose is knitted. It’s a little triangle shape in black which is sewn on to the snout and filled with a bit of toy stuffing to give a bit of shape. Next the ears are knitted in beige. They are done flat but when made up you fold them over and sew onto the head.
After that its time to tackle the body which is the biggest bit of knitting you need to do. It starts off with only 10 stitches to cast on but then there are a number of increases to create his tummy. The cast-on edge becomes the bottom of the dog and the cast-off end is where his head will be attached.
Next, the front legs are created all in white yarn. When you get to row 31 you need to mark it as that helps when you are sewing it together and how it is attached to the body.
The back legs are started in the beige colour yarn but finished in white.
The paws in both of the front and back legs are quite large.
There is a little tail to knit in beige and white.
This design has a little beige patch on the back of the dog. This is knitted flat and then sewn on to the back once it is completed.
Finally make the little collar which has only 4 stitches in the row so goes very quickly.
There are some details in the pattern pdf which help you figure out how to put it together. I found these helpful but I also needed to keep referring to the picture.
I found this project very enjoyable as it is quite varied. You are creating little pieces which don’t take long to make. Filling it up was quite fiddly but you soon get the hang of it. It was well worth the effort as my niece’s son loves playing with it. I have had loads of positive comments and people have asked me to make them one.
My next project is going to be the Dera Dogs


