Are you new to knitting and struggling with understanding knitting gauge in patterns? As with any hobby, there are new words to learn the meaning of. Maybe you’ve asked yourself the question: what is this gauge that you see in patterns? It’s normally listed under the materials section at the beginning of the pattern.
I was in the same situation, and I decided to find out exactly what it meant and whether I should be concerned about it.
So, if you are looking for an explanation and help with getting gauge, then hopefully this guide for beginners will make it clearer.
In this post, you will find out –
- what knitting gauge is, and from that you will understand why it is important to take note of it.
- Next, I will show you how to go about getting gauge,
- and finally some tips on what to do when you don’t get the same gauge as your pattern.
Definition of Knitting Gauge
Before we go any further, I think it will be helpful to first define what is meant by the word ‘gauge‘ in knitting terms.
Gauge is a system by which a pattern designer can tell anyone reading that pattern, and who wants to replicate that same garment (size wise), how to do so.
All knitters who follow a certain pattern will make their knitted stitches with differing tensions – ie tightness or looseness.
While I knit relatively tightly, my mother, on the other hand, knitted in a much more relaxed and looser way.
At one time, several members of my family were knitting a communal blanket. My mother started it, then one of my sisters carried on, my aunt tried briefly, then I had a go for a while. The result was that it was not a regular rectangular shape!
The edges were not straight at all, and when we put it flat on the bed, it kind of bubbled in the middle where my mother’s loose knitting was done. That blanket became the family joke. As it was just a blanket, it did not really matter, and will still be treasured by us all as everyone contributed to it – even my aunt, who said that knitting made her feel nauseous!
Understanding Gauge Knitting
The point here is that everyone knits differently, so if a pattern is to be replicated to exactly how the designer made it, then we need some maths to get there.
What the gauge in a pattern tells us is how many stitches the designer knitted in 4 inches (10 cm) and how many rows they had in that same 4-inch vertical dimension.
AFFILIATE DISCLAIMER
Disclosure: This post may contain affiliate links for products recommended. This means that if you click a link and buy something I may receive some compensation, but this is at no cost to you the reader. Thank you for visiting this website.
To make things easier, let’s look at a real example.
In this free Tegan baby hat pattern from LoveKnitting.com, the gauge is listed as follows:
“Tension (Gauge)
22 sts and 30 rows to 4” (10 cms) square in stocking stitch on 4mm (US Size 6) needles”
What this information tells us is that, in order for us to make an exact copy of this baby hat, we need to use the recommended double knitting yarn, and 4mm needles.
But, we also need to make sure that when we knit it, we have 22 stitches in a 10 cms swatch of our knitting work. This is called the stitch gauge.
Also, we need to make sure that we have 30 rows of knitting vertically for every 10 cms of work. This is called the row gauge
So, what the designer is saying is, in order to get your project looking and fitting like theirs, you need to make sure that the tension of your knitting is such that you achieve their stitch and row gauge figures.
If you don’t knit at exactly this tension, then the hat will either be too small or too big.
After going to all the trouble of following the pattern and creating the project, we want to know it is going to fit the baby for which we are making it.
So, hopefully, now you understand the nature of the problem with differing tensions, and how it can affect the usefulness, or not, of your knitting projects. Knowing this, you can see why getting gauge is really important.
Does Getting Gauge ALWAYS Matter?
At the beginning of this post, I asked the question about what gauge really meant. I have defined it so that you can easily understand what those figures mean. You will understand now that it is a way to exactly replicate the item that the designer created.
However, what if you are making something like a scarf or a baby blanket, where perhaps you are not too fussed about getting it exactly the same size as the pattern. If the scarf is a bit wider (or narrower) or a bit longer (or shorter), you might not really care too much. In these situations, you could be forgiven for ignoring the gauge section in a pattern.
However, be careful if your scarf or blanket has a design to it, which could be affected by a different gauge. An example of this might be if you had a square design on the item. A different gauge may cause those squares to become rectangles and the whole thing is out of proportion and just does not work!
Checking the gauge does require a bit more effort, but I think it’s worth it if you want your knitting to be a success.
I would rather spend a couple of hours knitting a gauge swatch sample, wash it and leave it to dry overnight to check my knitting tension, than knit something that is not fit for purpose. I have heard it said that if you don’t check gauge, gauge will get you!
If you choose not to check it, here are some problems you might encounter:
- the sweater you made does not fit the little girl you made it for!
- you run out of yarn to finish off your project, and you
- might not be able to find more yarn that matches exactly
- be disappointed as what you make does not end up looking like the one in the pattern.
The key point here is:
If you are knitting something that needs to fit, then you must take that extra time to check your tension, and get the gauge that the pattern recommends.
Other Benefits of Checking Your Gauge
Besides checking your tension, knitting a swatch sample allows you to test out the yarn you have chosen. You get to practice a bit with it first before going ahead with the pattern. It may be that as you knit the sample, you find you don’t like knitting with it, or that it’s not suitable for the project you planned on using it for. Also, if it’s a yarn that maybe needs a bit of careful knitting – ie splitting yarn then you will get to practice with it first.
Checking your Gauge
So, next the step becomes how to figure out if your knitting tension is the same as that of the designer.
How to Make a Knitting Gauge Swatch
We do this by knitting what is referred to as a gauge swatch. This is a small square sample of knitting that is worked using the recommended yarn, and needle size.
Once we have a sample of our knitting, we can then measure a 4-inch (10cm) square of it and count the number of stitches and rows in it. Then we’ll know if our tension is the same as that of the designer who created the pattern. If it’s matching, then we say we have “achieved gauge.”
When we know that our knitting tension is correct, we can carry on with the pattern, as we know it’ll come out as expected.
On the other hand, if we do not get gauge, then we have to make some adjustments, which I will mention a bit later. For now, we need to find out how to go about making up that knitting gauge swatch.
How to Knit a Test Swatch to Check Your Tension
Make the sample square of knitting to be a bit bigger than 4 inches – usually 6 or 8 inches so that you can get a more accurate measurement in the middle of that work. The outer edges of the square tend not to be so accurate. The stitch used for the sample square is usually stockinette stitch. If it is not, the pattern will tell you which stitch to use.
In our example pattern mentioned previously, it says to achieve gauge, you need 22 stitches within a 4-inch square. What I do is to multiply that number of stitches (22) by 1.5 – that is 33 stitches. Then I add 8 stitches – 4 for each edge as a garter stitch border. So in all, I’d cast on 33 plus 8 which is 41 stitches for the swatch.
Start by knitting 6 rows of garter stitch to form the lower border edge. Then from the 7th row onward, garter the first 4 stitches, and the last 4 stitches to form the left and right hand borders. For the rest of the stitches, knit as stockinette stitch – one row knit, one row purl. Once you have done nearly 6 inches or so of knitting, form the top border by knitting garter stitch for another 6 rows. Cast off.
Now you have your swatch sample. It should look something like the picture below.
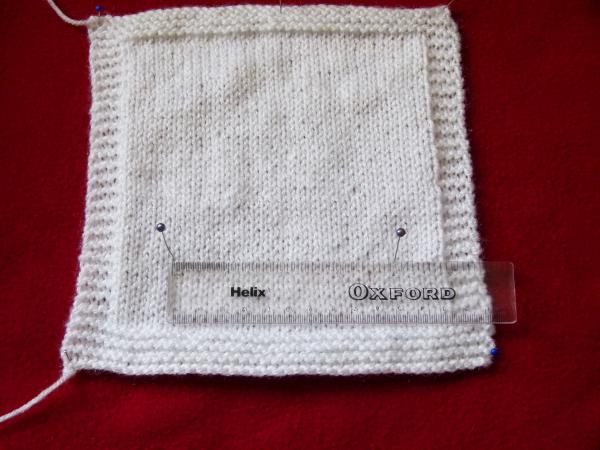
Knitted Swatch – Checking Stitch Gauge
Once you have knitted it, you really should wash it in the same manner that you would the garment when it is finished. I know it seems a lot of effort, but think how frustrated you’d be if it did not fit. Sometimes different yarns can change with a wash, so it’s best to check.
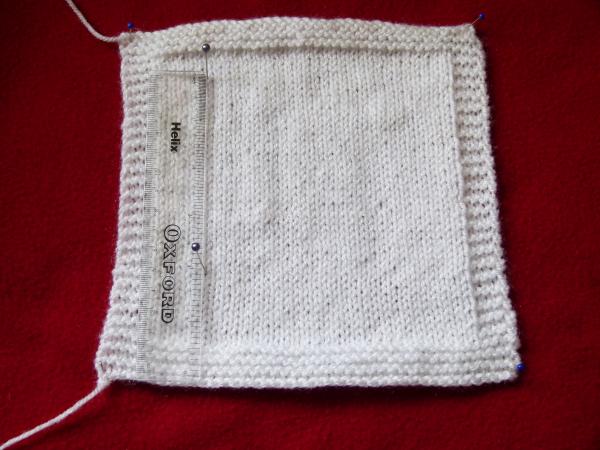
How do you measure a knitting swatch?
Once washed and dried, put your swatch on a flat surface. Mark with a pin or stitch marker an area 4in (10cm) square in the middle from where to count your stitches. You can use a ruler or a specially devised measuring device called a knitting gauge square to demarcate the area you are going to count. Carefully count the number of stitches in 4 inches, and how many rows you have knitted in 4 inches as well.

Checking Stitch Gauge & Row Gauge
The stitch gauge is the number of stitches in that four-inch row of knitting, while the row gauge is the number of rows of stitches in the vertical 4 inches of knitting.
Once you have measured and counted the number of stitches both horizontally and vertically then refer back to your pattern to see if you have achieved gauge or not. In our example, it would be 22 sts and 30 rows to 4 inches (10 cms)
If you’ve got gauge, you can get on with knitting your project!
Knitting Gauge Adjustment
Sometimes you may not get the correct knitting tension and have to make an adjustment.
So what can you do?
Did you get More Stitches than the Pattern Gauge suggested?
If you had more stitches than the required number, it means that your stitches are too small/tight. In this situation, you’d need to knit another swatch using the next larger size knitting needles up. Larger needles mean your stitches would be bigger, and that should translate into reducing the number of stitches in that four-inch square.
Did you get fewer stitches than the Pattern Gauge recommended?
If your gauge count showed fewer stitches, then that means that your stitches were too large /loose, so try again with the next size smaller needle. Smaller needles mean tinier stitches and that means there will be more in the four-inch measurement.
Knitting Gauge Problems
If the gauge you achieve is very different from the recommended one in the pattern – for example, if it is off by more than a few stitches, then it is more than likely that there may be others factors at play.
Sometimes changing the needle size does not fix the problem.
Things like how tightly or loosely you pull the yarn as you form stitches can have a big effect on the gauge.
Try altering the type of knitting needles you are using. By this I mean moving from needles made of metal such as aluminium, to say, bamboo needles. Metal is more slippery than bamboo material so it could affect the tightness of the stitches you are forming.
Sometimes the yarn you are using is just not a good match for that pattern. Always try to get as close to the recommended yarn as you can – it’s just not worth wasting time fiddling around to get it right with a very different yarn.
Consider also that you might find you eventually get gauge but then the item you are making just ends up being too stiff or too loose. In this case, it probably points to the incorrect yarn type being used. Decide to use your favourite yarn for a pattern for which it is suited rather than trying to make it fit a current pattern.
The good news is that, most of the time, when you use the recommended knitting needle size, and the correct brand of yarn, you will get gauge more easily than you think.
For more knitting tips take a look at the Learn to Knit category


