Disclosure: This post may contain affiliate links for products recommended. This means that if you click a link and buy something I may receive some compensation, but this is at no cost to you the reader. Thank you for visiting this website.
In this post, you will learn how to do intarsia knitting colourwork for beginners. If you have ever seen those lovely colourful pictures that have been created on knitted Christmas sweaters, you will have probably also wondered how it was done. This technique is what is used to make these beautiful colourwork creations.
It gives the appearance of being complex, but it is quite simple once you are shown how to do it. I found it quite easy to do once I had learned from watching this video (below) This post will show you how the method works.
London-based knitting designer and intarsia expert Ruth Herring shows you how to do it, step by step. (Watch the video below) Using a simple red and white colour change she demonstrates exactly how to join in a new colour and how to treat the different yarns so that you don’t get an ugly gaping hole.
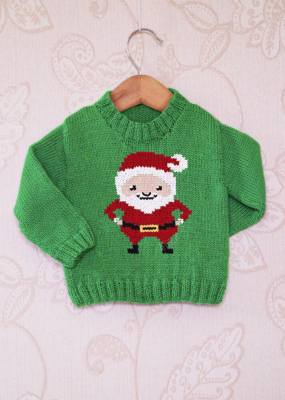
After you’ve practised the technique use those new skills to make a child a Santa Christmas sweater.
Each Colour Section has a Separate Bobbin of Yarn
This technique is used to create knitted garments with blocks of colour in a design. Each section of colour is made using a separate bobbin of yarn so that there is no floating of yarn threads at the back of the work.
Each time you have a new section of colour you will need a separate ball or bobbin of yarn. These can be just small balls of yarn manually wound up, or you could use pieces of cardboard to wind the yarn around. You could even use a clothes peg or even buy a specially manufactured gadget for this purpose. To see more ideas for bobbin systems please read my post here.
Watch the video above to find out what intarsia is all about and the techniques involved. Then put what you’ve learned into practice with a project like the jumper I’ve suggested below – or any project you like.
While watching the video put into practice the techniques that are covered. I have summarised them below.
Joining in a New Colour of Yarn
Put your needle tip into the stitch where you need to change the yarn. Now make a loop with the new yarn leaving a long enough tail which will be weaved in later. Place the loop around the needle and knit the new yarn in as normal. Continue knitting in the new colour as required. Don’t knot the loose yarn.
At the end of the first row – a knit row you will see that there are some gaps where you joined in the new yarn. Don’t worry about this as it will sort itself out after the next purl row.
Purl row
Just as you knit the first row, work the second one a purl row following your chart or pattern. As you work along when you need to change yarn first put the needle into the stitch and then set about getting the threads in order. Remember the old yarn goes to the left and on top, which then means the new yarn will come from underneath so locking the stitches and closing any gaps up.
Old Colour Goes to Left, New Colour In from Right Under Old
Remember this ………….
I found this is the key bit to avoid gaps forming – as long as you do that, it will work out ok!
After you have mastered these techniques it is time to put them into practice with a real project like this sweater pattern – link below – click the image (affiliate link). It is a basic design with a ribbed round neck.
Supplies Needed
Below is a list of the things you’ll need to for this project.
- Child’s Santa Christmas Sweater Knitting Pattern with Intarsia Chart
- Cascade 220 4 Ply Fingering 100% wool yarn
- Single-pointed Straight Knitting Needles 2.75 mm (US 2) and 3.25 mm (US 3)
- Stitch holders
Looking for more Intarsia knitting patterns? View More Here


