Disclosure: This post may contain affiliate links for products recommended. This means that if you click a link and buy something I may receive some compensation, but this is at no cost to you the reader. Thank you for visiting this website.
While looking for a free knitted baby beanie pattern using circular needles I came across this very detailed video tutorial that shows the viewer exactly what to do step by step – from casting on to finishing off the hat.
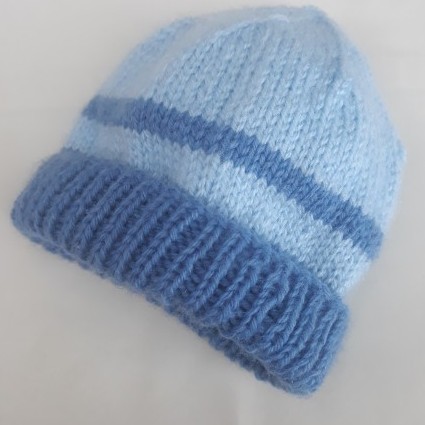
One of my nieces recently gave birth to a tiny baby boy who arrived 7 weeks too early. When he finally gets out of the neonatal critical care unit where they live it will be Winter so I was asked to make him several warm hats. I have made several projects by knitting in the round and so wanted to do this one that way too. I am never happy with my efforts to sew up a seam using mattress stitch. They never look good – hence my choice of the circulars.
When you watch the video tutorial you’ll find out exactly how to make the hat for a baby between 3 and 6 months old. As I need to make one for a newborn baby I used fewer stitches at the cast on stage and 4-ply baby wool, and my knitting is quite tight so I am hoping it will fit.
Supplies Needed
You’ll also need a large-eyed blunt sewing needle to finish off the hat and to weave in your ends. Make sure that it has a blunt end so that it does not split the yarn when working with it.
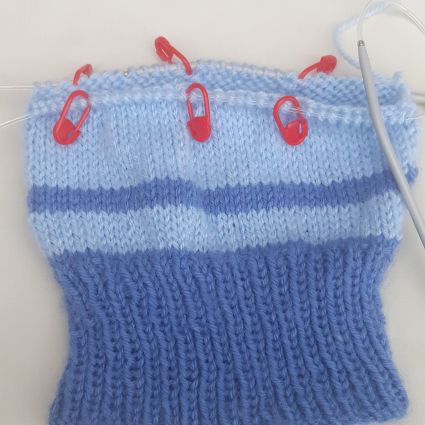
You’ll also see in the video that Sara advocates the use of stitch markers to make it easier to get the decreasing correct.
Step by Step Instructions
- In the video, Sara uses the long tail cast-on method. If you know and use another cast-on method, that will be quite ok to use too. I personally like to use the knit cable cast-on method as I like the neat edge that it gives.
- 3.40 mark <== At this point you will find out how to get started setting up the magic loop technique and joining in the round
- make sure all the stitches are pointing down and in the same way so that you don’t get a twist
- pull a loop out with the cable at the midpoint of the stitches
- working yarn on top and comes off back needle
- push stitches to the end of the bottom needle so you can work them more easily
- take top needle and pull some cable out – this needle is going to be the working needle
- now join the round by knitting the first stitch.
- Continue with ribbing pattern of knit 1 purl 1 til you get to the end of the stitches on that needle remember what you last stitch was – knit or purl
- To start working on stitches on other side you just need to drop the one needle point, and turn the other, with the already worked stitches on, so that it is at the top with working yarn on top of the needle
- push the stitches on the bottom needle to end of its point, pull out some cable on top needle and continue working in rib pattern
- once you have completed a round tighten up the threads at the join and continue with ribbing stitch pattern for 4 rows or to your preferred depth. Add a stitch marker
I made a deep section of ribbing as I wanted to have a deep brim and be able to fold it over.
Make the Body of the Beanie Hat
Once you have the depth of ribbing that you want, you then move on to working the body of the hat by just knitting each round. This will have the effect of making a stockinette pattern. To make the garment a bit more interesting I added a stripe of a different colour yarn. Knit stockinette for about 5 inches or 13cm or so – roughly 31 rows
10.40 mark Now you can start working the shaping for the crown.
While doing the last round on the body section, place a stitch marker in between every 10th stitch evenly across the round
Decreasing to Shape for the Crown
Knit eight stitches then knit two stitches together – then pass stitch marker over, continue like this for the round.
Next round – knit 7 then knit 2 together and repeat to end of round.
Continue like this knit 6 and knit 2 together and repeat til the end of the round. Next continue with this pattern knitting 5 and knit 2 together, then knit 4 and knit 2 together and so on.
Continue to the point when you have two stitches in between each of the stitch markers.
At this point, you will knit 2 together all the way around and remove your stitch markers as you go. Depending on how many stitches you started with you might end up with 8 total stitches at this stage. Do another round of knitting 2 together to get to 4 remaining stitches.
With 4 stitches left cut your yarn and thread the end onto a sewing needle with large-eye and blunt end. Thread the stitches off the knitting needle onto the tapestry needle. Pull them tight and weave in ends on the inside. And that’s it you’re done!
If you know how to knit and purl, cast on and off this little project is perfectly doable. It makes a lovely useful gift for any new baby. If you have not done any circular knitting before then this is an ideal starter pattern to get used to using these types of needles and the Magic Loop method of knitting in the round.


